ForeverStrong® Fitness

  • Home
  • Our Method
  • Location
  • Schedule
  • 250+Testimonials
  • Contact

Build a Killer Squat……. Part 2 – Face the Wall Squat

Part 2 of  3 Part Series:

Part 1 – The Goblet Squat 

Part 2 – Face the Wall Squat (You Are Here)

Part 3 – Core Stability and Breathing Techniques

Getting better at squats is the simple matter of squatting more often.  The more you practice with good form, the better you’ll get.  Building the foundation to a better squat involves first learning the fundamentals with bodyweight-only movements, incorporating a better warm-up, working on your overall mobility, and developing more core strength.

Last week I introduced the steps for a killer Goblet Squat, but not everyone has the killer form needed to perform it effectively and safely. This week I will teach you the steps to perfect that squat by teaching the steps to do a Face the Wall Squat.

If you missed my first article this series, you can click here to read it.

Building the Foundation with Fundamentals

Face the Wall squats are the perfect way to teach someone how to squat correctly.  The wall squat drill is performed while facing a wall. You will squat down as far as you can, without any part of your body coming in contact with the wall.  The visual reference of the wall forces you to stay tall and upright as you squat down.  You will also want to make sure your knees track over your toes and you keep your torso in a neutral or straight position.  As you get better, and your hips and upper back become more mobile, you will be able to squat lower and lower. There is no cheating in a wall squat. If you develop some good wall squatting form your body will forever thank you when you start really loading on the weight.

What is it?

A squat performed standing close to and facing the wall, with nothing touching the wall.

How to do it:

  1. Stand facing the wall;
  2. The first time you perform this move your toes should be around 5 to 6 inches away from the wall;
  3. Your toes should not be straight ahead, but pointed out. If pointing straight ahead is 90 degrees, then your toes should be between 45 and 90 degrees;
  4. Raise chest and lock lower back. Raise your chest high and consciously try to flex the lower back. This will actually get easier later, as you get closer to the wall;
  5. Push your hips back. A good way to visualize this is to imagine that there is a wall behind you that you are trying to touch with your butt. You drive the hips towards that wall. At this point, do not squat down, just push the hips back;
  6. Open your knees and squat. As your hips start to move back, you now begin to open your knees and let your body sink between your legs. Keep your chest up;
  7. Your arms should hang between your legs;
  8. Stand back up. When you reach the lowest depth that is comfortable for you, reverse the motion by strongly arching your upper back, squeezing your glutes , and pushing your heels into the floor;
  9. Once you have the movement down, move a little closer to the wall and repeat. As you get closer to the wall you will develop more flexibility and strength;
  10. Only go as low as you feel comfortable. Do not worry about depth. As time goes on you will be able to squat deeper;
  11. For the best results you should do this as a stretch at the beginning or end of your workout, not as an exercise.

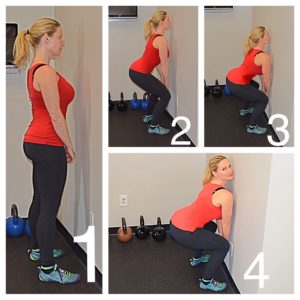
As an added bonus, getting closer to the wall requires you to maintain almost perfect squatting form.

Benefits of the Wall Squat:

    1. Consistency is the main component in this exercise if you are really looking to improve your squat;
    2. Perfect for those that can’t maintain good squat form;
    3. Will give you a very good sense of balance. You will have to learn that your weight must be on your heels and you will learn how to move your body correctly. If you don’t, you fall backwards or stick your face into the wall.
    4. Great mobility tool;
    5. Strong core, quad, and back activation;
    6. Reduces risk of injury;
    7. Improves Spine Position and teaches resistance against forward collapse;
    8. Only a wall needed.

By doing the Face the Wall Squat consistently, you’ll see that the improvements you make squatting translate into other movements that you do everyday.

Do not do anything that hurts. If it hurts, there is something wrong. Do not force yourself into positions or over-exert yourself in the performance of this exercise. It is best considered as a stretch or movement practice. As always, consult your doctor before beginning any exercise program.

This is installment 2 of a 3 part series.

Part 1 – The Goblet Squat 

Part 3 – Core Stability and Breathing Techniques

We are proud to say that we’ve helped hundreds of people in Howard County and the surrounding areas learn and perfect their squat. If your looking for a personal trainer near Marriottsville, Turf Valley, Waverly Woods, Woodmark, West Friendship, Eldersburg, Sykesville,  Woodstock,  Cooksville, Ellicott City, Mt. Hebron, Clarksville, Fulton, Laurel, Burtonsville, Highland, Silver Spring, Columbia, Ellicott City, Glen Elg, and Maple Lawn we’d love to help you. Call us at 301-452-5547 to see for yourself. Mention this article for a free session!

Save

Save

Save

“I was sleepy all the time. I felt sluggish, weak, irritable, and depressed.”

Hi. I’m Kelly Scott, the owner of ForeverStrong. And … ...

https://youtu.be/lbSq90mj7-Y
https://youtu.be/9pFBtw_9YWI
https://youtu.be/b5A7MnjdK6Q

*INDIVIDUAL RESULTS MAY VARY
Copyright © 2023 · TrainForeverStrong.com
2020 Marriottsville Road, Suite B, Marriottsville, MD 21104 · Phone: 301-452-5547

Log in · Privacy Policy